This guide will show you how to use Jekyll to build a webcomic site and host it for free using Github Pages.
This does require a bit of coding, but it’s not too difficult to learn! If you need help while working on this, feel free to @ me on Twitter; I’d be happy to chat with anyone working through this guide.
About the Webcomic Theme
This is a Jekyll webcomic theme, which means it’s meant to be used with Jekyll, a static site generator. However, you don’t need Jekyll in order to use this theme. Github Pages can take markdown files organized in a specific way and build the site for you.
What's Jekyll?
Jekyll is a free static site generator, which takes a collection of HTML, CSS, markup files and turns them into HTML.
Your files need to be in a certain directory structure for the static site generator to work. Once you start modifying your site, you'll need to navigate this directory to find the files you want to update. I recommend you learn a bit about how this directory is structured.
Note: Jekyll is pretty cool! The more you learn about how to use it, the more you can do with your webcomic site.
What's Github Pages?
Github is a platform for project hosting (mostly code) and version control. You'll be using it to host your website files. [Github Pages](https://pages.github.com/) is a free static site hosting service for Github users. You can push Jekyll website files to a special Github repository and it'll build and host the website for you.
You don't need to worry about this right now, but if you're curious, here's Github's guide on creating your Github page.
STEP ONE: Create a Github Account
You’ll be hosting it on Github Pages, a free service offered to anyone with a Github account.
Note that you username will be a part of your webcomic site’s URL. So you may want to use your artist handle or a username that has to do with your webcomic.
Note: You can use a different webhost if you want, but you’ll need to go the Jekyll route and learn how to build your website locally before hosting it elsewhere. Github Pages will build a website for you using your Jekyll directory.
STEP TWO: Create a new repository for your site.
- Go to the upper right-hand corner and click the + icon. Then, click New repository.
- Name your repository. I recommend you name it after your webcomic.
- Click Create repository.
STEP THREE: Import code from the Plain Webcomic repository
- When you open your new repository, you’ll see a lot of options for adding code to your repository. Scroll to the last option and click Import code.
- Paste in this link https://github.com/peahatlanding/Plain-Webcomic.git and click Import. This will import ALL the code from the current Plain-Webcomic repository. That includes this line, which you’re reading right now!!! WHAT! Don’t worry, you can delete the /docs folder from your own repository.
STEP FOUR: Enable Github Pages
- From your repository, click the Settings tab.

- Scroll down to Github Pages. Click the Source dropdown menu and choose master branch.
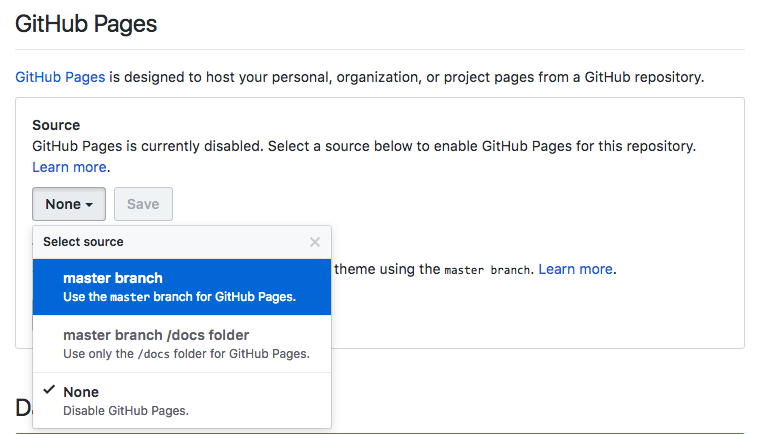
- Click Save.
- When your site’s ready, a green ribbon will appear telling you where you can access your site. It might take a while to build, but keep checking until your website goes live. Note: You might need to add
/index.htmlto the end of the URL.
STEP FIVE: Modify the site for your use!
You got the website working! Now it’s time to modify the look and feel of the website and add your own comic pages.